How to Integrate Seatmap Pro?
Integrate interactive venue seating charts into your ticketing platform with a TypeScript SDK, REST API, and visual editor. Seatmap Pro handles the visualization layer while your system retains full control over bookings, pricing, and payments.
Request a DemoStep 1
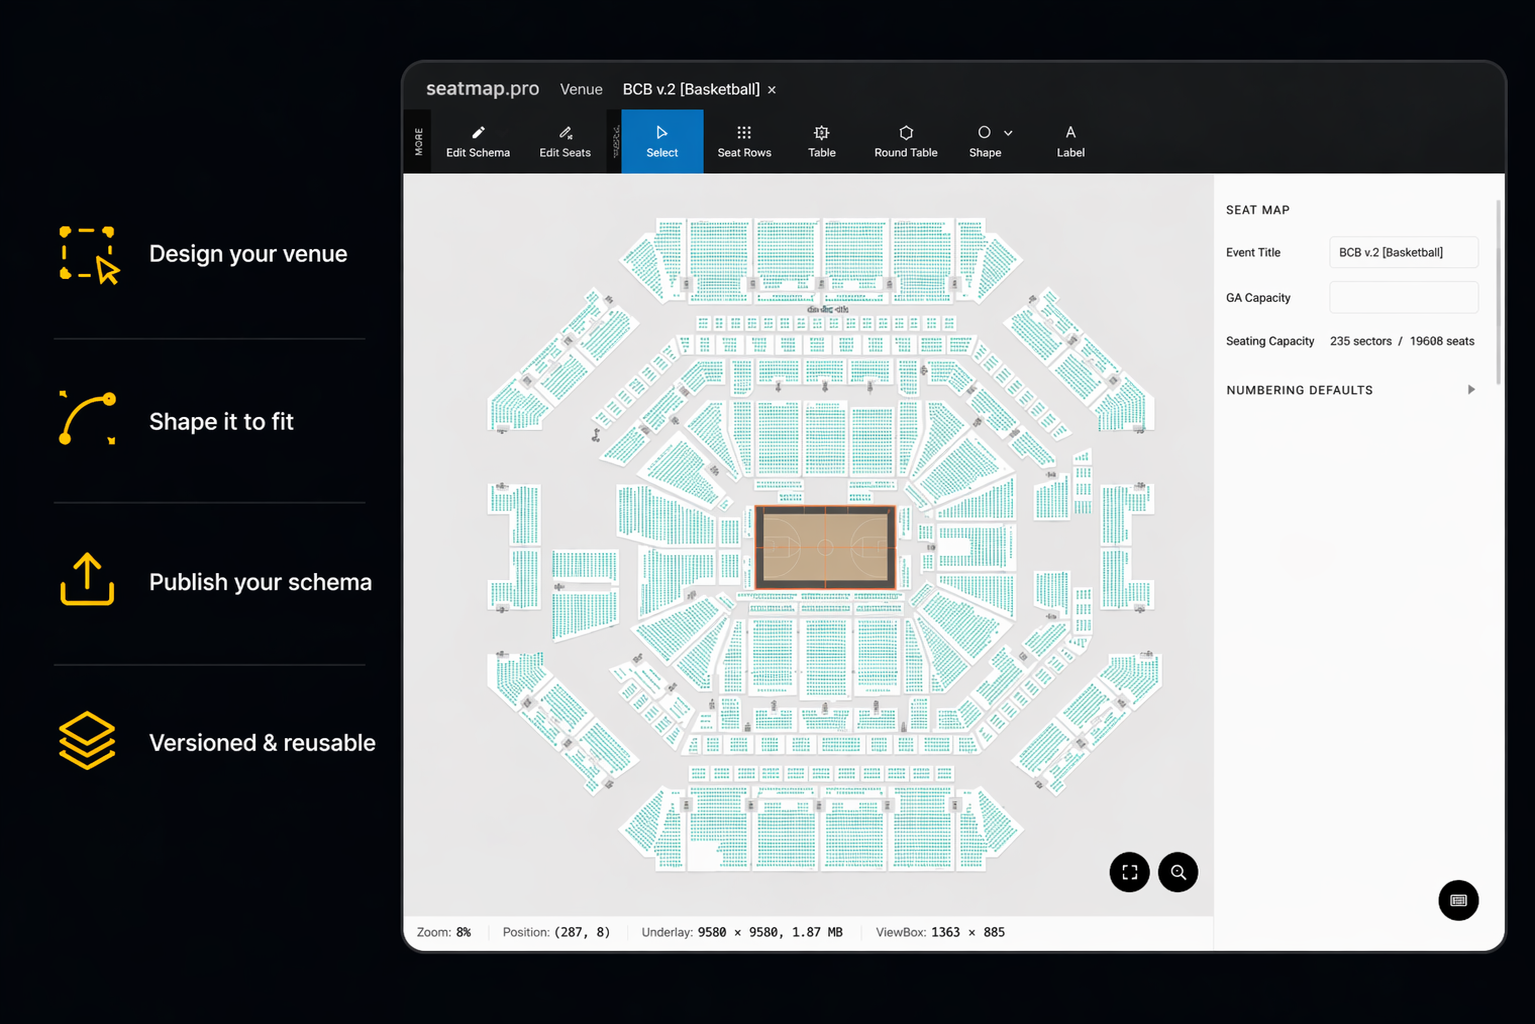
Create a Schema for Your Venue
Use Seatmap Pro's visual Editor to design a professional seating chart for any venue. The Editor supports numbered seats, general admission sections, tables, standing areas, and mixed layouts. You can embed the Editor directly into your backoffice application via iframe with SSO autologin.
Use Drag-and-Drop Tools
Create seat rows, sections, and shapes with drag-and-drop. Adjust numbering, define aisles, and apply transformations like rotation and curving. Import existing SVG floor plans as background layers.
Draw the Overall Venue Shape
Use the Venue Shape tool to align seats to the actual geometry of your space. Rows automatically curve and adjust to fit arenas, theaters, and stadiums of any size.
Publish the Schema
When a schema is created and published, it is ready for event and price assignment. Schemas are versioned and can be duplicated across multiple venues and configurations.
Step 2
Set Up the Event
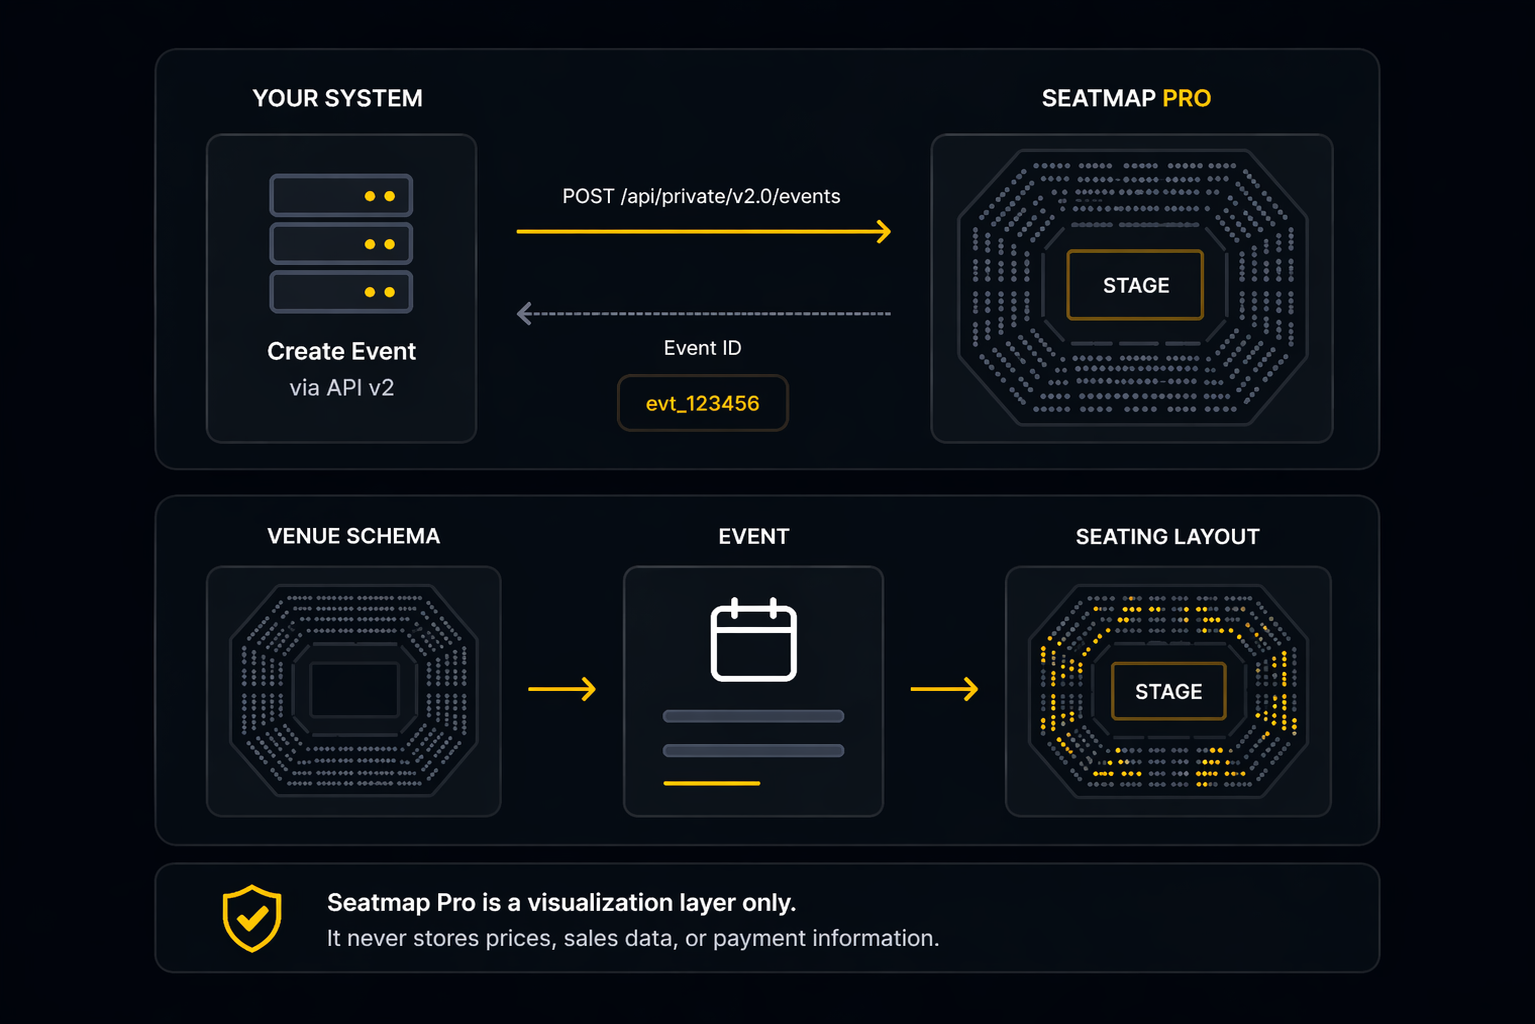
Create events via the Booking API v2 and link them to your venue schemas. Each event connects a specific date, time, and show to a seating layout. Your ticketing system remains the single source of truth for all booking data.
Seatmap Pro operates as a visualization layer only. It never stores prices, sales data, or payment information on its servers.
Create an Event via API
Use the Booking API v2 to create events programmatically: POST to /api/private/v2.0/events with your venue schema ID, event name, date, and configuration. The API returns an event ID used by the renderer.
Link an Event to the Designed Schema
An Event connects your schema with specific prices for a particular show. Multiple events can share the same venue schema, each with independent pricing and availability.
Step 3
Set Your Prices
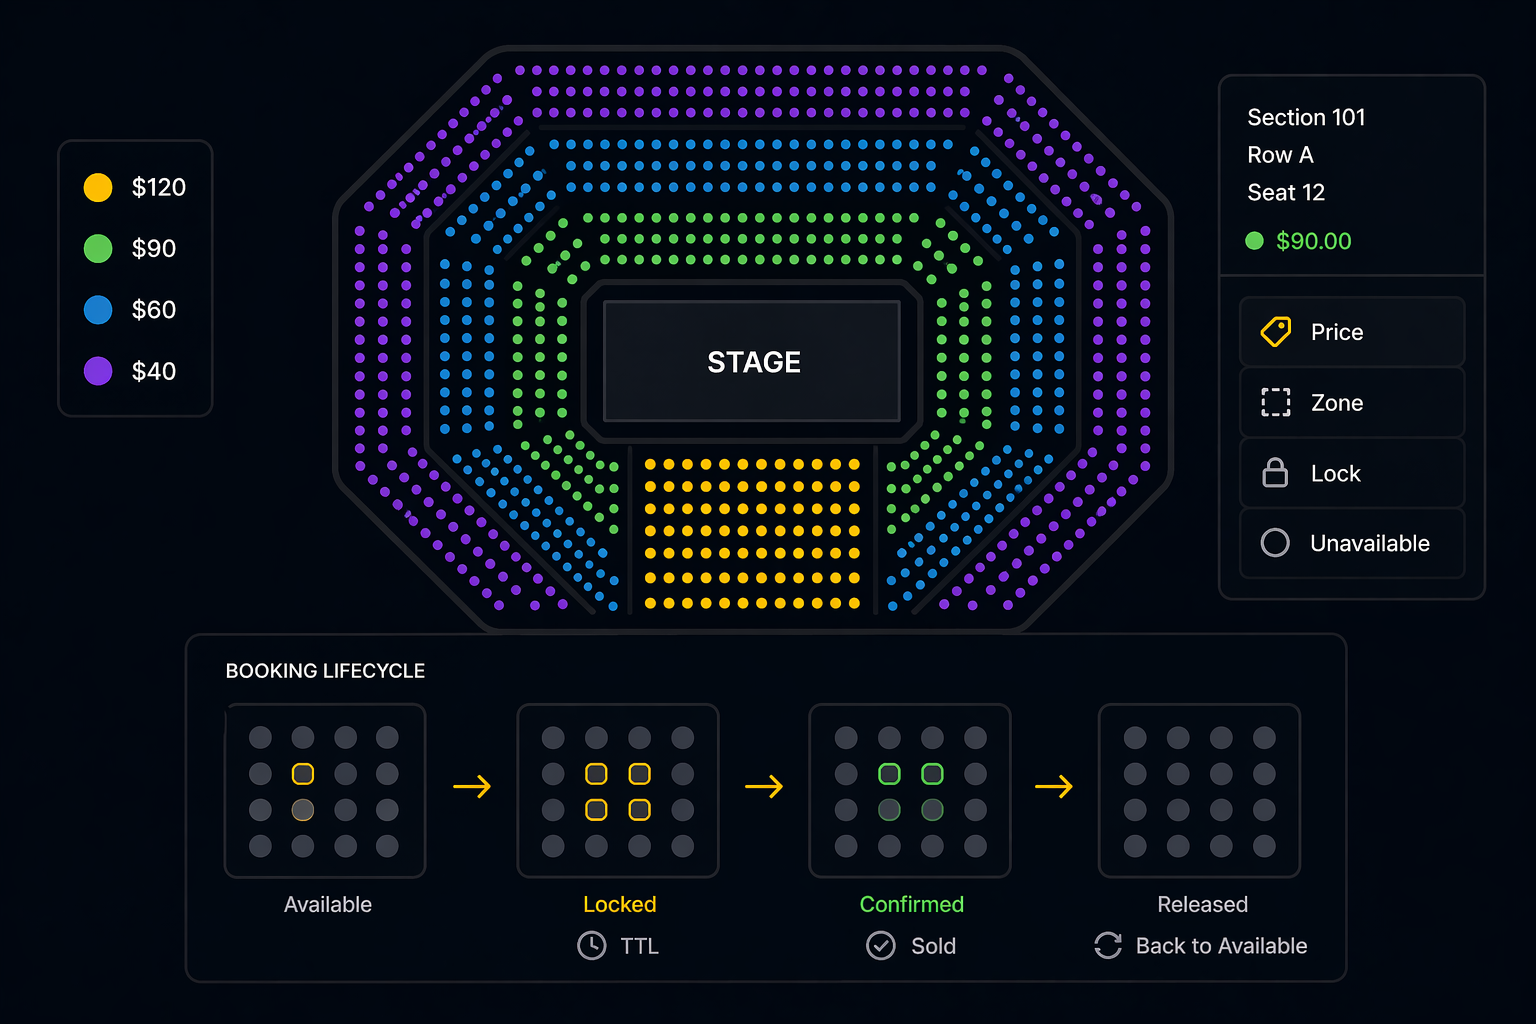
Assign prices to individual seats, rows, sections, or categories via the API. Each seat has a unique key based on section, row, and seat number. The Admin Renderer provides a visual interface for managing pricing zones and seat states in your backoffice.
Assign Prices for the Event
Set prices via API calls or visually through the Admin Renderer component. Seatmap Pro supports multiple price tiers per event with real-time availability and two-way synchronization with your ticketing system.
Manage Booking State
The booking lifecycle follows a lock-confirm pattern: seats are locked with a configurable TTL (time-to-live), then confirmed as sold after payment. Expired locks are automatically released back to available status.
Step 4
Show the Seating Plan to Your Users
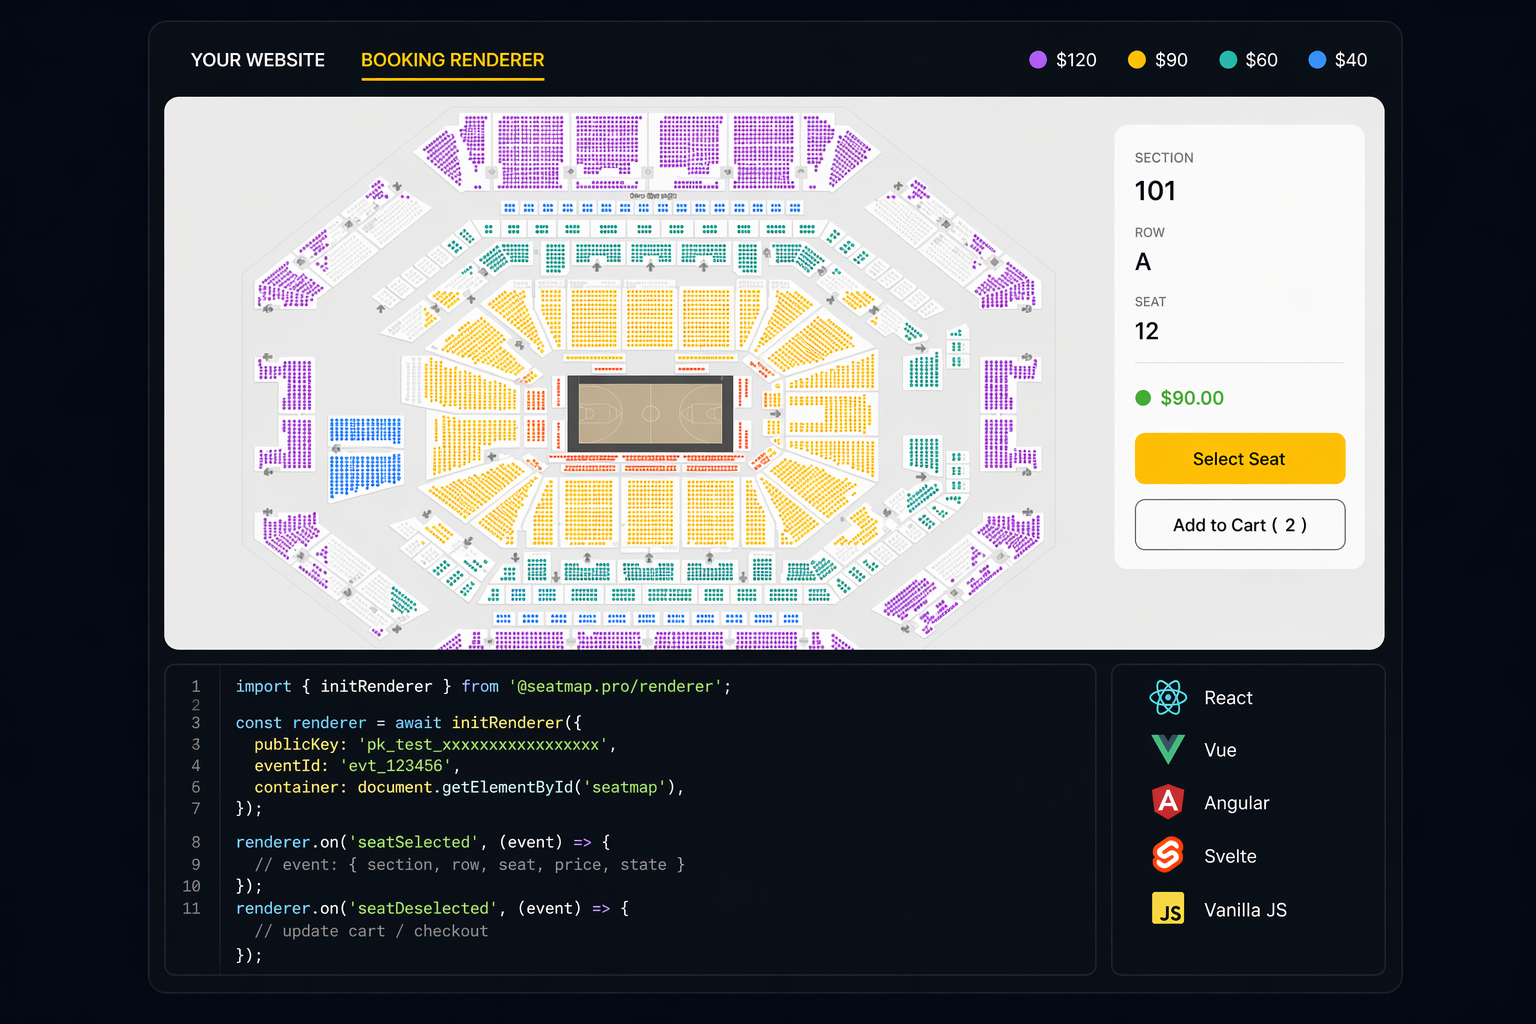
Embed the Booking Renderer on your customer-facing sales page. Install the @seatmap.pro/renderer npm package and initialize it with your public key and event ID. The renderer handles WebGL-accelerated visualization for 10,000+ seats at 60fps, real-time availability display, and seat selection callbacks.
Install the TypeScript SDK
Run npm install @seatmap.pro/renderer to add the SDK to your project. The renderer is framework-agnostic and works with React, Vue, Angular, Svelte, or vanilla JavaScript.
Handle Seat Selection Events
Subscribe to seatSelected and seatDeselected callbacks to update your cart. Each event provides the seat key (section, row, seat), price tier, and availability state. Integrate these callbacks with your existing checkout flow.
Quick Integration Example
Install the Booking Renderer SDK and render an interactive seating chart in a few lines of code. Pick the stack that matches your project.
import { useEffect, useRef } from 'react';
import { SeatmapBookingRenderer } from '@seatmap.pro/renderer';

export function SeatmapEmbed({ eventId }: { eventId: string }) {
  const container = useRef<HTMLDivElement>(null);

  useEffect(() => {
    if (!container.current) return;
    const renderer = new SeatmapBookingRenderer({
      publicKey: import.meta.env.VITE_SEATMAP_PUBLIC_KEY,
      container: container.current,
    });
    renderer.loadEvent(eventId);
    renderer.on('seatSelected', (seat) => {
      console.log('selected', seat);
    });
    return () => renderer.destroy();
  }, [eventId]);

  return <div ref={container} style={{ width: '100%', height: 600 }} />;
}
'use client';
import { useEffect, useRef } from 'react';
import { SeatmapBookingRenderer } from '@seatmap.pro/renderer';

export default function SeatmapEmbed({ eventId }: { eventId: string }) {
  const container = useRef<HTMLDivElement>(null);

  useEffect(() => {
    if (!container.current) return;
    const renderer = new SeatmapBookingRenderer({
      publicKey: process.env.NEXT_PUBLIC_SEATMAP_KEY!,
      container: container.current,
    });
    renderer.loadEvent(eventId);
    return () => renderer.destroy();
  }, [eventId]);

  return <div ref={container} style={{ width: '100%', height: 600 }} />;
}
<div id="seatmap" style="width: 100%; height: 600px;"></div>
<script type="module">
  import { SeatmapBookingRenderer } from 'https://cdn.jsdelivr.net/npm/@seatmap.pro/renderer/+esm';

  const renderer = new SeatmapBookingRenderer({
    publicKey: 'YOUR_PUBLIC_KEY',
    container: document.getElementById('seatmap'),
  });

  renderer.loadEvent('EVENT_ID');

  renderer.on('seatSelected', (seat) => {
    console.log(`Selected: ${seat.sectionName} / Row ${seat.rowName} / Seat ${seat.seatName}`);
  });
</script>
import { createHmac } from 'node:crypto';

const SEATMAP_API = 'https://booking.seatmap.pro/api/private/v2.0';

export async function createEvent(schemaId: string, name: string) {
  const res = await fetch(`${SEATMAP_API}/events`, {
    method: 'POST',
    headers: {
      'Content-Type': 'application/json',
      'X-Api-Key': process.env.SEATMAP_PRIVATE_KEY!,
    },
    body: JSON.stringify({ schemaId, name }),
  });
  if (!res.ok) throw new Error(`createEvent failed: ${res.status}`);
  return res.json() as Promise<{ eventId: string }>;
}

export function verifyWebhook(signature: string, body: string) {
  const expected = createHmac('sha256', process.env.SEATMAP_WEBHOOK_SECRET!)
    .update(body)
    .digest('hex');
  return signature === expected;
}
Here is what You Get
Benefits Seatmap Pro platform brings to the table.
Increased Ticket Sales and Revenue
Interactive seat selection with real-time availability reduces cart abandonment and increases conversion rates compared to static seat maps or dropdown-based selection.
Improved Time to Market for Your Product
The TypeScript SDK and structured REST API mean your development team can have a working integration in days. AI coding assistants can generate integration code from our documentation.
Data-Driven Insights for Better Decision Making
Track seat popularity, pricing zone performance, and booking patterns through the API. Use the Admin Renderer to visualize occupancy and adjust pricing strategies in real time.
Ready to Get Started?
Request a demo, and see Seatmap Pro in action. Map out your success with a secure, user-friendly and versatile solution for ticketing platforms.
Request a DemoIntegration FAQ
Common questions about embedding Seatmap Pro into a ticketing platform.
Can I integrate seating plans with my existing event website?
Yes. Install the @seatmap.pro/renderer npm package and mount it on any container in your existing frontend. The Booking API v2 handles events, prices, and the lock-confirm flow, while your ticketing platform stays the source of truth for orders, payments, and customer data. Integration typically takes a few days, not weeks.
Which ticketing services support dynamic seat maps via Seatmap Pro?
Seatmap Pro embeds into any ticketing platform via iframe or the JavaScript SDK. There is no lock-in to a specific stack — the renderer works inside React, Vue, Angular, Svelte, or vanilla JavaScript, and the REST API is callable from any backend language. Current production integrations span Ticketmaster-class platforms, regional ticketing operators, and venue-direct ticketing apps.
I need a seat charting tool — which should I use?
Pick a tool that exposes both an embeddable renderer (so your buyers see an interactive seat map) and a REST API (so your ticketing backend stays the source of truth for orders). Seatmap Pro covers both — a TypeScript SDK published as @seatmap.pro/renderer for the buyer side, and Booking API v2 for the backend lock-confirm flow. Editor, renderer, and API ship as one product.
How long does it take to integrate Seatmap Pro?
A working integration typically takes 2-5 working days. Day 1 covers schema design in the visual Editor. Days 2-3 are spent wiring the Booking API v2 (events, prices, lock-confirm) into your ticketing backend. Days 4-5 embed the renderer on the customer-facing sales page and handle seat-selection callbacks. The TypeScript SDK and OpenAPI-described REST API mean AI coding assistants can scaffold most of the integration code from our docs.
Does Seatmap Pro charge per seat sold?
No. Cloud SaaS tiers are flat annual fees with a yearly cap on confirmed sales; On-Premise is a flat €20,000/year with no cap. There are no per-seat overage fees during normal operation — when you approach your tier cap, upgrade to the next tier (prorated) or move to On-Premise. See /pricing/ for full details.
Where does the booking data live — Seatmap Pro or our ticketing system?
Your ticketing system owns all order, payment, and customer data. Seatmap Pro stores schemas, seat states, and lock-confirm timing only. With On-Premise, even seat-state data never leaves your infrastructure. Payments, refunds, and PCI-scoped data are never handled by Seatmap Pro.